Showing posts with label Bedroom. Show all posts

Friday, March 18, 2016

Dreamy

I'm sure many of you have already seen Rebecca De Ravenel's sunny abode in Domino, if not, you're in for a beautiful home tour.  If you've already seen it, I am sorry you have to see these pictures again, but I couldn't resist not sharing on my blog.  It's that good.


I have to admit this room's paint color has me completely rethinking the paint color I picked for my living room (FB Blackened).  I was all set for a very pale gray with blue undertones, but now I see this and I am rethinking my decision.  Ugh.  I hate when that happens.

If I ever win the lottery, I would love to own Paule Marrot's piece of art called 'Clouds' seen above over the tortoise looking console.  In my dreams, I know.   It is so beautiful, calming, serene and feminine.  


Back to Rebecca's home.  I love the white octagon coffee table and bits of rattan.  Hillary Thomas' shop has a gorgeous white lacquered octagon table (just like this) (on super sale) here.  If I had the space, I'd snatch it up! 

Of course, I spot all my favorite designer's fabrics in my favorite colors.


So much goodness - woven shades, Lulu DK art, ticking slipcovers, awning stripes, raoul textiles…..the list goes on! I love how the decor is so effortless and eclectic.  


Ahh…the bedroom.  Blues and pinks.  Love it all!   So many things to study and to look at.  Do you remember her NY apartment published in Vogue?  See below.  This is how her bedroom looked back then.


And, here is more of now.


Raoul's blue and white Kashmir delft gets me all the time!  How wonderful does it look on that little tufted settee and in her bedroom!  And, the pink shaded sconce?   I remember that settee in her NY apartment which was in her living room.  See below.  


It's always fun to see how designers re-purpose their furnishings.  The settee looks great in both settings.


If you're interested in seeing her NY apartment in Vogue, go here.  It's always fun to see how her style has evolved and how she switched things around!  

Friday, February 26, 2016

Friday Favorite: Brooke Crew Interiors

It's not often when you stumble on a designer's portfolio and you say scream 'Yes' to everything in her/his portfolio.  I found Brooke Crew Interiors who is based in Greenwich, CT while perusing IG and was SO, SO inspired.  If you don't follow her, you are missing out!

I am in love with her designs and I'm particularly infatuated with the work she is doing on Catherine Tompkins' home in Greenwich.  Her home is beautiful!! Think Sister Parish, Elizabeth Eakins, Raoul Textiles, Bennison, Quadrille and Dune and Duchess.  I don't think it gets much better, does it?


To see more of this beautiful house and of Brooke's feed, go here!  Enjoy the weekend my friends!!

Thursday, November 19, 2015

DIY Upholstered Scalloped Headboard with Nailhead

I have received a bunch of questions about the DIY headboard I made for the ORC (One Room Challenge) and so, I am going to attempt to give a high level overview of how we (the husband and I) went about to create my inspiration.


For the bed, I used a full size mattress that fit perfectly in the room. I wanted the headboard to be the focal point, so I wanted the headboard to be tall as possible to maximize the space and make a presence.  

The overall dimensions of the headboard ended up being 56.5" wide and 68" tall from the ground to the tallest point on headboard.  We made the headboard from plywood and MDF.  


We went to Lowe's and bought a 4' by 8' sheet (1/2" thick) of plywood and a similarly sized piece of MDF.  We used MDF because it would be easier to nail the nailhead into MDF than plywood.  In the above picture, the MDF is the darker brown material and the plywood is the pine colored material.

We cut down plywood sheet down to 56"x 26".  The MDF was used for the two legs (39"x 5"), the right and left cutouts on the headboard which had an overall dimension of 14.5"x 13.5" with a radius of 10.5" and the center piece which was 27"x 27" with a scalloped top and radius of 13.5".  Does that make sense?  I hope so because my husband calculated those measurements.  Thank goodness for his math background!  


Above, you can see how I positioned the MDF pieces (5 total) onto the plywood, squaring it up with an L-square.  

My husband screwed the 5 MDF components (two legs, two side cutouts and one middle scalloped piece) into the plywood.  He wasn't fooling around, I think there are 30 screws in that headboard - see below.


Above you can also see how I hot glued a basic foam sheet (bought this at JoAnn's) onto the plywood so that this part was soft and cushy when guests lean on it.  Moreover, now the plywood part with the foam was level with the MDF.    

Next, we wrapped batting (also from JoAnn's) around the headboard.  We wrapped two layers so that it was extra thick and used a staple gun to secure it to the headboard.  I bought the thickest batting they had and we decided to secure the batting first before adding the fabric.  


The hardest part of this whole headboard (besides the nailhead) was making sure both the batting and fabric were taut around the curved portions.  I suggest using a very durable fabric, like the one I used from here, because you do a TON of pulling to make sure the curves are smooth.  I ended up buying 2 yards of fabric.  

Don't chintz out on the fabric because it really makes a difference with how easy it is to work with.  I'm actually surprised the fabric didn't rip at points where I pulled it so hard.  You definitely need two people to do this part.  One to pull the batting/fabric very tightly and one to staple the batting/fabric with a staple gun.  


Above is the headboard without nailhead.  You can't see it but the legs are also wrapped in batting and fabric.  I should've gotten a picture of the whole thing - I forgot.  


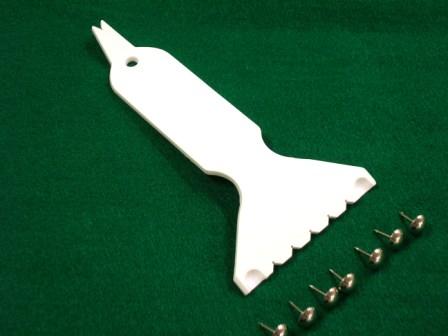
I bought a nailhead spacer (above) from amazon or ebay (I can't remember) and brass nailhead (pictured below from JoAnns) to use on this project.  Be prepared to buy a lot of these nailheads.  For every one nailhead I got right, I screwed up maybe three or four.  No joke.  


Since I wanted my nailhead to be spaced and not sit right next to each other, I inserted a nailhead into every other indent on the spacer.  So, at any given time (using the spacer) I was inserting three nailheads at one time instead of five.  


I placed the nailheads about  2.5" from the headboard edge.  As you can see from above, I used push pins in as placeholders for the railheads.  I actually put the push pins in my nailhead spacer and inserted these before my nailhead.  Don't worry - the fabric I used was VERY forgiving and you didn't see any hole marks, etc.  Thank goodness!!

Doing above was a lifesaver!  It helped because it provided a visual of how the nailhead would look before I started hammering in the nailhead (so I could readjust certain push pins if need be).  And, it just made the whole inserting the nailhead go faster.

I literally would take out a push pin, insert a nailhead and hammer it in with a rubber mallet.  My husband did create some templates out of poster board that helped me create even lines, but I wouldn't say that they were the most helpful.  And, be prepared to take out the nailhead and do it over.  At one point, I did the whole entire scalloped top again and it took me forever.


So, there you have it!  At the end of the day, I spent $55 on plywood/MDF, $55 on batting, foam, nailheads, mallet and spacer and $90 on fabric.  Grand total $200!!  Price doesn't include the $$$ spent on Kim Crawford's Sauvignon Blanc which was definitely needed to complete this DIY!!!

Feel free to email me with any specific questions that you may have!

Thursday, November 12, 2015

ORC: Week Six - Final Reveal

I can officially say that I have completed Linda's One Room Challenge and survived to tell about it!!!  I might've neglected my family, our pet fish and the house for the past week, but I am very, very happy with the outcome!!  AND I can also officially say (and my husband will agree) that our guest room is soooo much nicer than our master bedroom - and there is something completely not right with that!

I am happy to share it with you.  Here is my guest room reveal….


Those beautiful brass nailheads caused a couple of gray hairs and took so painstakingly long.  For every one I got right, I ruined about twenty.  No joke.  But, it worth the hundreds I saved from buying a new headboard.  


If you remember, below is a picture of our guest room BEFORE:


And, this is our guest room (and which also pulls double duty as my office) AFTER:


Below is a snapshot of my huge homasote DIY bulletin board that also serves as my catch all inspiration and design planing board. 


And, my little desk below surrounded by all the many things I love and treasure.  


For those of you who have followed along, thank you so much for sticking with me!  This was a great challenge for me personally and professionally!  If there is enough interest, I'd be happy to put a blog post together about my DIY headboard.  I think I spent approximately $180 in materials and supplies at the end of the day. 

If you are just tuning in, I've just spent the past six weeks participating in Linda's One Room Challenge and you are welcome to read more about my guest room's transformation during the previous weeks here.   Thank you Linda for hosting my first ever ORC.  Hop over here to see the other participants and their crazy transformations. 

Also, I'd like to thank Nicole Pullen who helped me with the photography! She is based in Louisville.

Sources are listed below.


Thursday, November 5, 2015

One Room Challenge - Week 5

One more week left for the One Room Challenge (ORC) and still lots to wrap up!  With a chest cold and 20% of my voice left, I got sidelined this past week but slowly getting back in the saddle. (I hope)!


I finally hung up my Serena and Lily mirror  above (that I've had for a while) and some art (that I have also had) above the desk that sits on the opposite wall of the bed!  Since the mirror is small, I need to balance the size of my desk with some artwork around the mirror.  I want to keep it simple and not have a cluttered look.

My desk is a black french inspired desk from Ballard Designs that I got long ago that I will pair with a white slipcovered parsons chair from Ikea.  Desk style similar to below minus the gold detailing.


I finally hung up my  DIY bulletin board (a huge piece of homasote that I reupholstered with ticking fabric) and this will sit above the bench. 


Hanging this was a lot trickier than I originally thought and planned!  Below you can see the bulletin board hung on the wall above the bench with the bed's euro sham and bolster!


So, where am I now?  Oh yes, the headboard.  The headboard has been the most interesting component of this challenge.  I have a new found respect for all the DIY-ers who have made one of these before.  Here is the headboard upholstered with the raffia fabric (bad picture). 


I'm 70% completed with the nailhead and I'll be honest I am not sure I love the headboard with the nailhead.  I know - the horror!!  

I can't put my finger on it as to why, just yet, but I'm hesitating whether to move forward with completing the nailhead or not.  It breaks my heart because I want to love it and after five hours of your life that you won't get back, that is a hard pill to swallow. 


But, that is where I am and I guess both you and I will have to wait for the reveal to see if I decide to keep the nailhead or not.  

But, I know one thing, I'm ready to get this room done!!!  Looking forward to next week - see you then!!  Go here to check out what my other fellow ORC-ers are doing!!  


Thursday, October 29, 2015

One Room Challenge - Week Four

Hello Friends!  The weeks for this One Room Challenge seem to be going faster and faster.  Crunch time is on!!  The push this past week was upholstering my headboard, but more on that later.

Let's talk about the fabrics in this picture, shall we?


The John Robshaw euro shams (turmeric in light indigo) came back from my seamstress and look fabulous.  

This alan campbell petite zig zag fabric will be the bolster that sits in front of the shams!  I wanted a pop of color and this fabric packs a lot of punch!  It has yet to arrive, but hopefully by Friday.
I originally wanted to do a blue and white gingham/check bed skirt.  Finding the perfect check size in the perfect color is a lot harder than you think.  Trust me I tried.


I did find one (pictured above - centered swatch) from the UK, but it was very expensive - that in addition to the labor of making a custom bed skirt was just a wee bit out of my price range.  

As I did more research, I found another bed skirt (not custom and not a check patter) but with a very similar look and feel for at least a third of the cost.  So, I went with that.   I have yet to receive it so we will see how it all works out.  If it doesn't work,  I might be scrambling at the 11th hour!

I plan on having light blue embroidered scalloped sheets to tie in the light indigo blue from the Robshaw shams.  

The rest of the bedding will be white which will offer a nice contrast to the raffia fabric on the headboard.  

I will have throw pillows on the bench which is why you see Serena and Lily's chambray diamond fabric in the first photo.  I didn't want the room to be all blue and red so I'll be throwing a little green in the mix.  In the photo below, I love how the green mixes so well with the blue and red. 


As you can see it is slowly coming together.   Still, so much to do and I pray that we have sunny days leading up to the reveal day so I can take some decent photos!

The headboard will be the MAIN focus this upcoming week.  I could write several posts on this DIY.  

Let me just say that upholstering a rounded headboard is not an easy task, my friends.  To say I'm nervous with how this will come out is a little bit of an understatement.  But, I'm clenching my teeth and moving forward!! 


Until next week my friends!  Here are weeks 1, 2 and 3!!  Wishing all my ORC friends out there the best of luck!!

Thursday, October 22, 2015

One Room Challenge - Week Three

Originally, I thought we had until November 19th to finish the ORC, but found out last week that it really is November 12th!  What??  Needless to say, I've had to shift into high gear, chop-chop.

If you haven't read week one or two, I've decided to focus on our guest bedroom (which doubles as my office).  But guest rooms tend to get the short shrift because they get used less frequently than other spaces in the house; mine is no exception.

I wanted the headboard to be a focal point.  I also wanted a tall headboard to give the room more height.  But tall headboards tend to be pricey so I knew going into this challenge that I would need to make my own.   Oomph's Charleston (below) is one of my inspirations.

Oomph's Charleston Headboard

I didn't want my headboard to be exactly like Oomph's, but I designed it to have a similar look and feel.  The middle peak is higher thus making the headboard feel taller!  Here is a shot of our guest room painted (BM White Dove) sans headboard:


Here is the skeleton of the headboard made from plywood and MDF (minus the batting, fabric, etc.).  Not finished yet … but it's on the move.  


So happy with how it turned out.  I will be upholstering it in a raffia fabric - see below!  I have trim and naihead picked out if I decide to go down that route.  


I was able to hang woven shades and get my bamboo curtain rod hung this past week.  Ignore the blue painter's tape on the bamboo rod!


I also tried out my budget-conscious Ikea panels.  I'm not sold on this look.  I think these drapes achieve the casual look I'm aiming for (they're sheer and light).  But a pinch pleat would be more professional looking, however it might be too formal.  I will keep you posted.  


I wanted a bench on the wall opposite the window.  This will be a place for guests to sit, put their luggage, lay out clothes, etc.  

Moreover, I plan on mounting a huge fabric-covered bulletin board above the bench.  This is where I will pin my inspirations, fabrics, notes, etc.  Recall: this room doubles as my office.  

Back to the bench: I chose a bench from Ballard Design (below).  When I saw it online I liked it.  When it arrived at my house, I fell in love with it.  It is perfect for this space!! 


And, lastly, to give you a preview of what other elements will be going in the room, here is a snapshot of what is yet to come.  Oh, and don't worry, I haven't even gotten to all the bedding (shams, bolster and bedskirt) and pillow fabrics!!


Does this really have to be completed by the 12th?  Yikes.  With friends coming in from NY this weekend and the guest room in still disarray, I foresee perhaps an all-nighter in my future??  Hopefully, this room will turn out better than my accounting final did in college.  :)