Wednesday, December 29, 2010

Catchin' Up

We're in Michigan right now relaxing with family and enjoying the lack of any type of schedule.  Sleeping in, playing ice hockey on the lake, eating home baked cookies and catching up by browsing some of my favorite home decor magazines.  I'm currently loving these pictures - great for some fantastic color inspiration....
SW Meander Blue (#6484)

BM's Wood Grain Brown (#2109-30)

BM's Hawthorne Yellow (#HC-4)

I also was able to catch up on the recent Renovation Style magazine featuring Meg Braff.  Here are two of my favorites pictures of her work...


Lastly, if you ever happen to find yourself in Ann Arbor, MI, you must go to The Treasure Mart.  My sister in law and I went there and it was amazing.  She walked away with a fabulous bamboo dresser for $75.  Not too dissimilar to this......


I hope you all are having a relaxing holiday week.  I plan to be back in full swing in the New Year!!  Happy New Year's!!  

Friday, December 24, 2010

Wishing you a joyous.....


I am so thankful for all of you who read Green Street - you are a source of encouragement and inspiration to me!  I hope and pray that you have a wonderful and peaceful Christmas!
Merry! Merry!

Christmas card is from the talented Dani Silver - Dani Notes Stationary.  

Wednesday, December 22, 2010

One Room, Two Looks

Two Martha Stewart editors, Rebecca Robertson and Kevin Sharkey were recently challenged to decorate a similar room in a week.  Rebecca Roberstson took her love for bold colors and graphics and created an "ecletic modern room."  Kevin Sharkey went back to his Parish-Hadly roots and created an"updated traditional" room.  Let's look at the two looks in more detail....First up, Rebecca Robertson.
What initially attracted me to Rebecca's room was her bold use of colors; and I couldn't ignore her use of  Madeline Weinrib patterns!  But, after more review, what really won me over was her creative DIY projects.  For example, she reserached and found unpainted victorian gingerbread baulsters and used them on her walls. Talk about a graphic statement!
She bought generic Ikea ready made cabinets with built in shelves and used punched MDF radiator material to cover the glass fronts of the cabinet doors for a custom look.  How genius is that?
Lastly, also seen on Karen's Strictly Simple Style blog, Rebecca covered simple bakers trays with a bold zig zag fabric she designed on spoonflower and topped them with plexiglass.  Love it.
All pictures above from Room Remix.

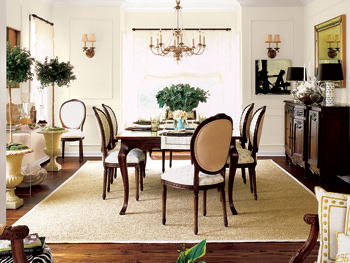
Now, let's see her competition - Kevin Sharkey. 

He first began with the gingham check grasscloth wallpaper - the scale reminds me of buffalo check which I really love. And, then he added Schumacher's floral garden wallpaper to the ceiling to add a fifth wall.  This is very different from how he decorated his current home. 
He said his inspiration was a garden room, hence you see the garden stool, wicker furniture, floral wallpaper, etc.
Similar to Rebecca, he bought unfinished ready made bookcases and added molding to make them look custom.
All pictures above from Shannon Berrey Design.

So, there you go - one room, two looks.  Have a favorite?  I do and would love to hear yours.  Go here to vote. 


Thursday, December 16, 2010

Finally Ready!

I'm happy to report we are finished with the Christmas decorations around our house. 
I swapped the artwork that is usually above our fireplace with the mirror that sits above my chest of drawers in our bedroom.  I made the wreath hanging on the mirror by taking ornament bulbs and securing them onto a wreath.  I hung real rope garland across the mantel. 

I added the two hurricanes to either side of the mirror to add some symmetry and height.  

Last year for stockings, I used these burlap bags that I thought were cute, but my husband was not a big fan.  I finally decided on the Garnet Hill Hable Construction stockings - I love how graphic they are. 

Lastly, we have our vintage Santa cookie jar from the days of my husband's youth and my German candle pyramid/carousel from my mother's home town in Germany (Trier).  

And, if you've missed our front door and dining room Christmas decorations, go here or our Christmas DIY gumdrop wreath, go here.  

Come join me & other bloggers over at Rene's Cottage and Vine 2010 Christmas Tour of Homes.

Monday, December 13, 2010

Nearly there...

This weekend we finished our Christmas decorations - the house is done, the stockings are hung and ready for Santa to arrive!  I was able to take a picture of our front door before we had the horrible rain and wind storm yesterday that knocked everything down.  Yup, garland, bells & wreath are all currently laying on our front stoop!
Oh well!  I still need to take more pictures of the inside but the natural lighting has been really bad.  In the meantime, here is a close-up of a little bar I put together in our dining room.  I bought 30+ of these blue and gold barware glasses at an antique store for $25.  I absolutely adore them.
More pictures coming soon.....
  

Thursday, December 9, 2010

From Formal to Relaxed...In No Time.

I read an interesting article on Oprah's website (O At Home) which discussed how accessoricies can really transform the feel of a space.  Now for all you designers out there, this is not new news, but for a lot of stay at home moms, new home owners or design enthusiasts, there are some key tips here that can be carried forward to fit any space.  The above is a picture of a family's dining room.  They loved it, but the truth be told, it wasn't practical especially for their toddler aged children.  They quickly realized that they needed to change things fast so their whole family could enjoy it.  So, they hired a stylist to help. 

So, what did the stylist do to make this space more relaxing?  First, he started with the rug and drapes.  Do you notice the sisal rug? - a family friendly option that brings instant casual chicness to the space. He then added  linen shades which immediately softened the room.  These 2 subtle changes transformed the space immediately.  Then, he added a linen PB table runner, an oversized centerpiece to break up the intimidatingly banquet - like dining room table and a lot of greenery.  Yes, plants do bring life to a room!  Personally, I also like how he broke up the symmetry and hung a painting below one of the wall sconces; it immediately adds interest and brings down the formality a notch.  The lucite console brings in the fun factor and modernizes the room while keeping your interest level up!! All in all, I think it is much more inviting and welcoming room. Let's take a look at their living room, shall we?
Beautiful furnishings, but a little sterile, huh?  Let's see what the stylist did to add some life to this space.
Ahh..much more relaxed!  I like it....again, he started with the rug and window treatments.  He decided to add a geometrically Jonathan Adler patterened rug on top of a sisal rug.  The sisal rug brings in the casualness and the geometric rug adds interest.  He hung linen shades to soften up the room.  He changed the coffee table which is a better fit scale-wise. Notice how he hung abstract paintings  below the sconces?  It adds more depth and sophistication to the room.

My favorite part is that added some animal prints to bring some 'fun' in the space.  The great things about animal prints is that they are great neutrals and will look in a lot of spaces. The room was given a more "lived in feel" by adding a couple more pieces of furniture - the Stella shelves by Oly and a Jonathan Adler floor lamp. 
What I love about this family's living and dining room transformations is that it has gone from formal traditional to casual tradition by just adding accessories.  I mean how easy is it for all of us to take away some of these tips and apply it to our own homes?  The best part of the article was when the client said she is 'shedding' her textbook ideas of how a house should look!  Amen, to that!  A living and dining room is not just for company - it is a place where your whole family can and should enjoy!

Wednesday, December 8, 2010

Happy Hump Day!

humble bumble tumblr
Hope you're having a good week!  I wish I could stay home today (and not go to work).  I'd love to wear cable knit socks, eat toast and jam, drink cafe au laits and bake Christmas cookies with my son!  Friday can't come soon enough!!  Happy Hump Day!

Monday, December 6, 2010

My Gumdrop Wreath

This Christmas season I was determined to make a gumdrop wreath.  So, this weekend with hot glue gun in hand and 7 packages of gumdrops, I set forth to make my gumdrop wreath.
I started off with a 12" foam wreath form from Michaels.  For starters, I wrapped packaging tape around the top of the wreath to protect the foam from the fishing line I used to hang the wreath.
I used a hot glue gun to stick the gumdrops on the wreath.  This was extremely easy to do - just seemed easier than using toothpicks.  But, learn from my mistake and don't place your gumdrops in horizontal rows like this.  
You see the gaps between the gumdrops?  Not good.  Instead, after you glue your first row of gumdrops, start to stagger the gumdrops in the subsequent rows so you don't have a gap between the gumdrops.  In other words, when starting your second row, place the gumdrop between the gumdrops in the first row.  Does this make sense?
This will eliminate the gaps and your wreath will begin to look dense.  The wreath took me about 4 hours.  Who has 4 hours these days?  But, I actually enjoyed sitting there (after my son was in bed), gluing one gumdrop after another onto this wreath.  Not complicated and a bit cathartic.  
The ribbon covers the fish-wire that is actually holding the wreath.  I love how it turned out!  Supposedly, there is a spray you can use to preserve the gumdrops.  I have no idea if this will keep until next year.  If I had more time, I'd love to make another one and offer it as a giveaway!  Maybe, next year!

Wednesday, December 1, 2010

Have you seen?

the sneak peek of High Gloss Magazine?  All I can say is, "I want to see more!" 
I am pretty confident this is a sneak peek of Tia Zoldan's kitchen.  I remember when Julie from Milk and Honey Home interviewed her back in July and posted new pictures of her home.  Here is another shot of Tia's kitchen via Milk and Honey Home.
Isn't the herringbone floor amazing?!  I am anxiously waiting until January; until then, you can read High Gloss Magazine's interview here.